
Learning how to play a song on guitar can seem daunting when you’re a beginner.
It might feel like an impossible challenge to learn all the parts to be able to play an entire song. But with the right method you’ll learn to get through even the most challenging songs.
In this lesson, I’ll explain a step by step method you can use to learn a song on guitar faster and easier.
If you want to start learning songs, also read this FAQ on how long it takes to learn songs on guitar.
Using Guitar Pro to Learn Songs
There are many different methods you can use to learn how to play songs on guitar. This method is what I have been using since I was a beginner and it makes use of a guitar program called Guitar Pro.
Guitar Pro is a program designed for guitarists to learn songs, write songs, and jam along with songs. I used this program when I was a beginner to learn and practice new songs and I still use it almost every day today. It’s my top recommendation for all guitarists because it can have such a big impact on your skills and understanding of music.
Check out my review of Guitar Pro 8 here to learn all about it.
You’ll see in this lesson how useful Guitar Pro can be in helping you learn songs faster.
Here are some reasons why I recommend using Guitar Pro to help you learn songs:
- You can easily find almost any song’s Guitar TAB in Guitar Pro format
- Guitar Pro includes tools to help you learn and master guitar parts (covered later)
- You can edit any Guitar Pro files to create your own versions or transpose into different tunings or keys
Once you have Guitar Pro up and running, you can move on to Step 1 and start learning songs.
Check out my review of Guitar Pro 8 here to learn all about it.
Step 1: Download the Song Transcription
The first step to learning a song on guitar is to find the song’s transcription. While you can learn songs by ear, this is an advanced skill I suggest learning later on (find out how to learn songs by ear here).
The good news is that there are plenty of free Guitar TAB websites you can use to find almost any song transcription you want.
Check out the best free Guitar TAB websites here.
In this lesson, I’ll show how to find good quality Guitar TAB from ultimate-guitar.com. They have the largest collection of song transcriptions online – all for free.
As an example, I’m going to show you how I would learn to play the song ‘Enter Sandman’ by Metallica. There are a lot of different parts to this song so it’s a good example. You can follow the same steps for easier or harder songs.
Start by searching on ultimate-guitar.com for the song you want to learn. Once you enter the song name in the search bar, you will probably see a lot of options for the song:
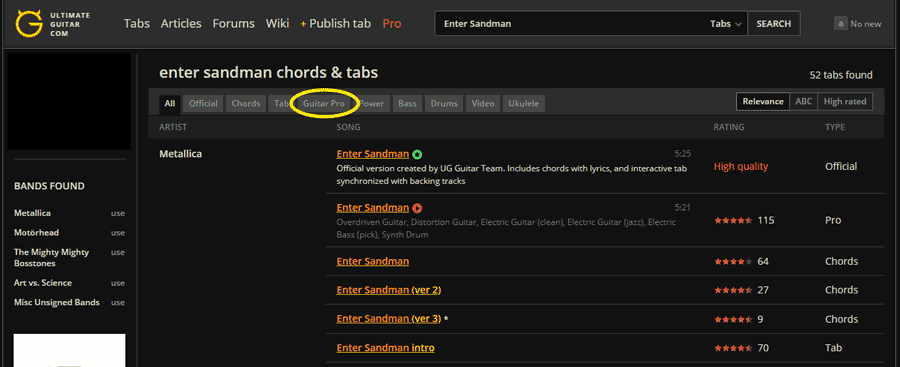
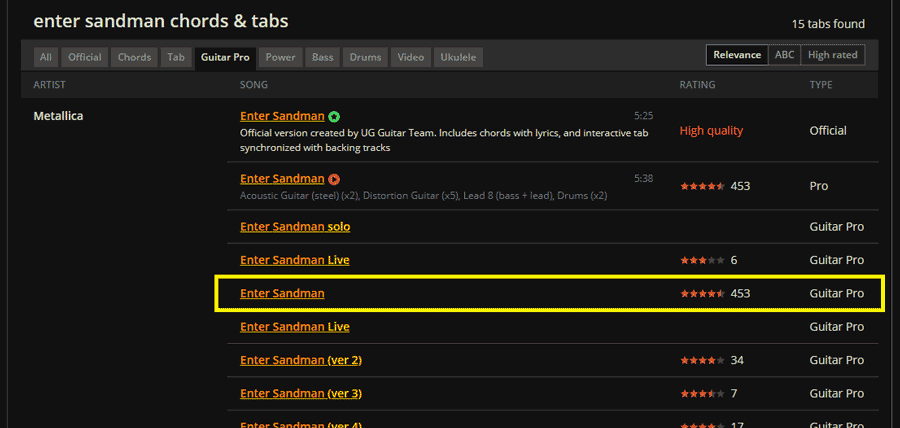
What we want is to download the most popular/highest rated Guitar Pro version. If I click the ‘Guitar Pro’ option highlighted above, I can see there are a few Guitar Pro versions with different star ratings. There’s one with 453 ratings and four and a half stars so that one is a good starting point.
Once you click that link you will see ads for the ‘Pro Version’. Don’t worry about any of that – we just want the free download. Scroll to the bottom and you’ll see a link to download the Guitar Pro Tab as you can see below:
![]()
Download the Guitar Pro file and save it somewhere you will remember for later on.
Step 2: Make a List of Guitar Parts
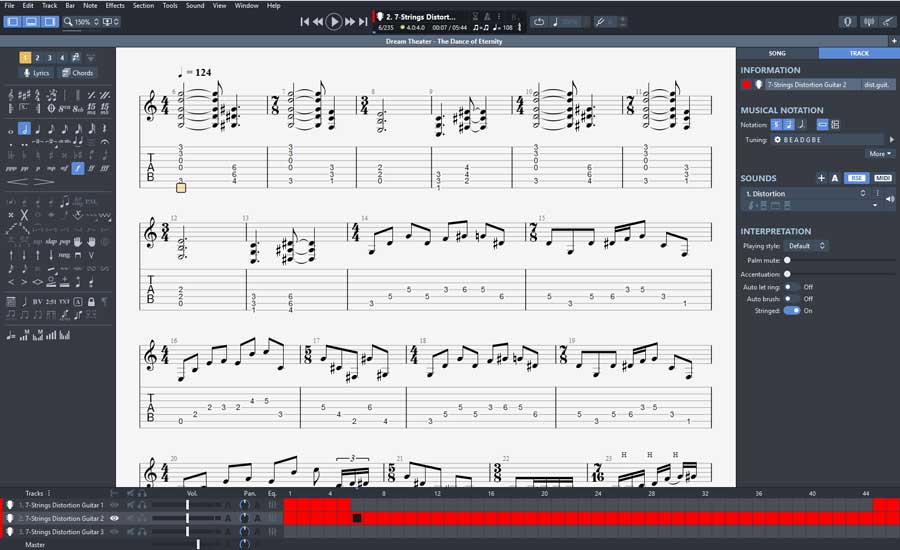
Open up your Guitar Pro file and take a look at the different instruments at the bottom of the screen:
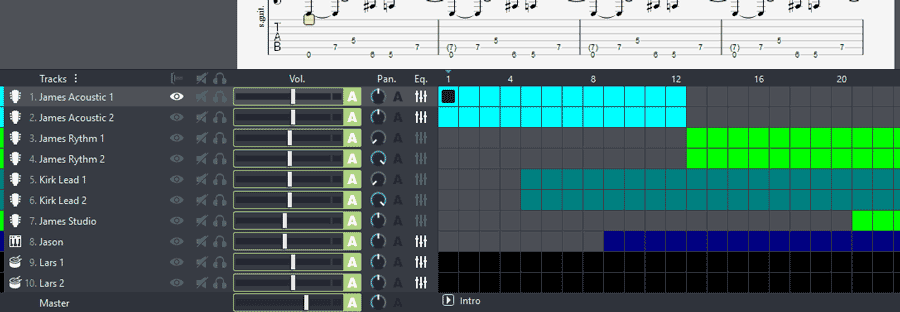
In this song, you can see there are two guitarists (James Hetfield and Kirk Hammett) and different tracks for different guitar parts. This is helpful if you want to focus on different types of parts such as the rhythm or lead tracks.
Have a look through all of the guitar tracks and start writing down all the different riffs/chord progressions you find. Some songs will only have a few different parts while others can have a lot of different parts. Having a checklist of all the different parts in the song gives you something you can aim for and tick off as you go.
Being able to cross a riff or progression off as you learn it makes the entire process a lot more rewarding. It feels good to cross parts off of a list as you learn them.
For example here is a list of the main riffs to learn for Enter Sandman:
- Intro clean riff
- Intro distorted riff
- Main riff
- Verse riff
- Pre-chorus riff
- Chorus riff
- Solo
While there are other parts in the song such as some extra lead licks, learning the above parts will get you through the entire song.
Once you have your list of parts written down as a checklist, take a look at each part and mark on your sheet how easy/hard they look to you. Some parts will be harder than others so it’s good to know before you start which parts are going to take longer and which parts you’ll be able to get through quickly.
For example, the solo in Enter Sandman is easily the hardest part of the song and it’s quite long. On the other hand, the verse riff is extremely easy and can be learned and mastered very quickly.
If you want you can also rank all the parts from easiest to hardest. Then you can decide whether you want to tackle the hardest parts first or start with the easiest parts and work your way to the harder parts.
If you’re unsure which way to go, I recommend starting with the easiest parts because it will feel far less daunting and you’re less likely to give up.
Step 3: Start Learning the Parts
If you follow the below steps, you’ll learn the parts faster and easier than just trying to play along with the song as I’ve seen a lot of beginners do over the years.
It might seem like extra work, but the below tips and advice can make a massive difference in how quickly you memorize the parts and how easily you can master them.
Memorize the Parts
Your first goal with any of these parts is to memorize the notes/chords.
The reason so many beginners struggle to learn to play something is that they’re trying to play parts they haven’t memorized. So you might get three notes in, then forget what the fourth note should be.
So if you start by memorizing the order of the notes or chords, you’ll find that learning to play those parts becomes a lot easier.
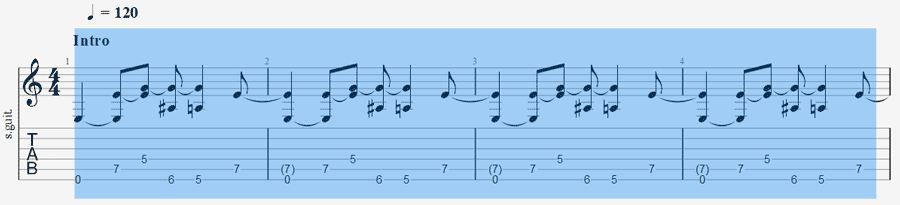
Start by reading out loud the notes in order without playing them on guitar. For example here is the first riff for Enter Sandman:

If you’re learning the song using TAB, you would read the fret numbers out loud over and over like this:
0 7 5 6 5 7 0 7 5 6 5 7 0 7 5 6 5 etc.
If you’re learning the song using standard notation, you would read the note names out loud over and over like this:
E E G Bb A E E E G Bb A E E E G Bb A E etc.
Why do this? Memorizing the order of the notes (or fret positions) before you try to play anything on guitar will make it so much easier when you actually try to play it on guitar.
Not knowing the next note is the most common issue students have when they’re learning a new part. There’s nothing more frustrating than playing everything perfectly, then getting stuck because you forgot what the next note is.
Spend some time calling the note names or fret positions out loud until you feel you have memorized the order.
Figure out the Finger Positions
Now you can try to play the parts on guitar with a focus on which fingers you should use. For example in the above riff, which fingers do you think you should use to play the 5th, 6th and 7th frets?
You definitely wouldn’t want to use the same finger for all of the notes, so what makes more sense to you? What if you use your first finger on the 5th fret? Then what would make sense for the 6th and 7th fret notes?
Learning to figure out which fingers you should use might be frustrating at first, but the more time you spend thinking about it, the quicker you will learn to figure it out for other songs. Try a few different finger positions and learn why one works better than the other.
There are a lot of lessons on YouTube that walk through guitar parts one note at a time and tell you which fingers to use.
You might be tempted to find a lesson that tells you exactly what fingers to use, but don’t do it!
It might feel easier at first, but you won’t learn why it feels right and you definitely won’t learn to figure it out on your own in the future.
A lot of beginners get stuck in a rut because they rely on YouTube videos telling them exactly which fingers to use. If you can’t play anything without somebody telling you which fingers to use, you’re going to get frustrated.
Take the time to learn how to figure out which fingers are the best to use in any situation and you’ll never have to rely on YouTube lessons like that again.
A general rule you can use to figure out which fingers to use is to think about one-finger-per-fret. So if a guitar riff is played on the 5th, 6th, and 7th frets (like the earlier example), you would use one finger per fret starting with your index finger on the 5th fret.
This won’t work for everything, but it will work surprisingly often and it will teach you how to think about finger positioning.
Practice the Part Slowly
The big temptation is to try and play the part like you hear it in the song.
Trying to play the part at full speed as soon as you have memorized the notes is a mistake. Take your time and get it right.
Play it as slow as you need to be able to play it perfectly. It’s okay if you need to stop and start or if you need to stop and think about the next note. But never rush.
At this point, you want to let the parts sink into your memory. Play them over and over at a really slow tempo and use the same finger positions every time.
Step 4: Use the Speed Trainer Tool
Once you can play the part over and over from memory without any mistakes (as slow as you need to), you might be ready to try and build up your speed.
A new feature in Guitar Pro 8 that isn’t in GP7 is the ability to import an audio file and sync it with the transcriptions.
This means when you work on learning a song in Guitar Pro, you can choose to hear the Guitar Pro instruments, or the actual audio from the song, or a mix of both.
Find out how to import and sync audio in Guitar Pro 8 in this review.
If you’re currently using GP7, you may want to consider upgrading to be able to import audio and practice along with the songs.
Guitar Pro has a tool that allows you to loop parts and gradually increase the speed each time you repeat it. This is an excellent way to develop your speed and control over the parts. I used this tool when I was a beginner learning basic parts and I still use it today for complicated lead parts.
Here’s how to set up the speed trainer tool:
1. Highlight the part you want to loop.
Below you can see I’ve highlighted the first four bars of the intro riff:
You can highlight any part you want to work on, so if you want to only work on part of a long solo or a few chords in a progression, just highlight those parts.
2. Click the Loop icon (or press F9):

If you press play now, the highlighted part will loop over and over. You might be able to play along with it now, but you’ll develop better skills if we start at a slower speed and gradually build the speed up.
3. Click the arrow next to the loop icon and select ‘Custom values…’
This brings up the speed settings as shown below:
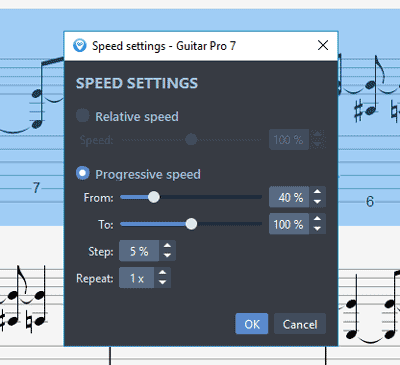
Click on ‘Progressive speed’ to set up the speed trainer.
The idea with this tool is it will start playing your loop at a certain speed, then gradually change it until it reaches the end speed you set.
In the above example, I’ve set it to start the loop at 40% speed, then after each repetition, it will increase the speed by 5%. It will keep looping the part and increase the speed by 5% each time until it reaches 100% speed.
Play around with different settings to learn how the tool works and what speed works for the parts you want to learn.
Set the starting speed slow enough that it feels too slow. That way you start off nice and relaxed. As the speed gradually increases, you’ll start to feel more pressure and need to focus more.
Eventually, you’ll either find you start making mistakes, start rushing or you reach 100% without any problems.
If you do start to feel like you’re rushing, making mistakes, or playing sloppily, stop and start the tool again. Every time you use the speed trainer, you’ll get a little bit better and will feel more comfortable at playing the parts faster.
The important point to remember is to not rush. If you rush, you might be able to play the part at full speed, but you won’t be in control of your playing and it won’t sound good to others. Take your time and gradually build your speed up over a few days.
Extra tip: after you think you’ve mastered the parts and can easily play them at 100% speed, try playing them at 110% speed. This is a good way to test how well you really know the parts. If you really have mastered them, you should be able to easily play them at 110% speed without feeling like you’re rushing or struggling to keep up. On the other hand, if you make mistakes, you rush or struggle to keep playing in time, that’s a sign that you haven’t yet mastered the parts and you should spend a bit more time working on them at a slower speed.
Step 5: String the Parts Together
Once you have ticked off all of the parts on your checklist, it’s time to start putting the parts together. Getting used to connecting all the different parts together will be easy in some songs and difficult in other songs. So you might spend 10 minutes at this step or you might spend a few days, it all depends on the song.
Look through the song to count how many times you need to play each part before you move on to the next part. If the song is complicated you might want to write down how many repetitions for each part to help you memorize the order.
At this point don’t play along with the tracks – you want to test your memory and see how well you can connect the parts together without any support. Don’t look at the TAB and start playing from the first part. Try to remember how many times you need to repeat it before you move on to the next part then keep going through the parts until you’ve gone through the entire song or you get stuck.
Once you can play the entire song on your own with the correct number of repetitions for each part, move on to the next step.
Step 6: Play Along With The Song
Now it’s time to really play the song. Guitar Pro allows you to easily play along with the song and it’s a great way to tighten up your timing and get used to playing along with any other instruments in the song. Then in the future if you want to play the song with other musicians, you’ll know what to expect and find it far easier.
If you have followed the earlier steps properly, you shouldn’t need to look at the transcription while you play. Have the Guitar Pro file playing, but avoid looking at it to really test whether you’ve properly memorized the parts or not. If you get stuck at any point, spend some more time working on those parts.
Here are two different ways you can practice playing along with the song.
Practicing Along With the Guitar Tracks
Playing along with the other guitar tracks lets you hear if you’re playing the parts properly.
If what you play doesn’t perfectly match up to the guitar parts you hear in the Guitar Pro file, you’ll notice it. You’ll hear that some notes are out of time or sound wrong. That’s a sign something is wrong and you need to look a bit closer at those parts.
Start off by playing along with all tracks active so you can hear the guitar parts while you play over the top of them. Do this until you feel comfortable with the song and don’t feel rushed.
Practicing With the Guitar Tracks Muted
Guitar Pro allows you to mute any track you want. This means we can mute the drum track, mute the bass, mute any vocal tracks or mute the guitar tracks if we want.
Once you feel comfortable playing along with the song with all the tracks active, mute all of the guitar tracks.
Depending on the song, this means you will only hear drums, bass, keyboards, or any other non-guitar instruments. For some acoustic songs, this might even mean there’s nothing playing. In that case, I recommend turning on the metronome (Sound > Metronome).
Learning to play the track with the guitars muted is crucial to properly learn the song. You don’t want to get too used to hearing the guitar tracks in the background while you play. Imagine trying to play a song in a band and not being able to do it unless another guitarist played along with you.
Muting the guitar parts helps you learn to listen to the other instruments and match up what you are playing with them. If the song you are learning uses bass and drums, spend a few minutes listening closely to those tracks before you try and play along so you get a feel for what to listen for. Quite often the bass parts match up with the guitar parts so that makes it easier to play along with.
To mute the guitar tracks, click the speaker icons for all the guitar tracks as shown below:
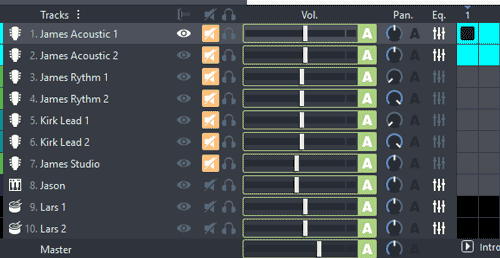
Notice that the muted tracks have the speaker symbol highlighted. When you hit play, you shouldn’t hear any guitar parts at all. The song might sound strange at first because you’re probably not used to hearing it without guitars, but you will get used to and feel comfortable adding in your guitar parts.
If you get stuck you can always add some of the tracks back in, but the goal is to be able to play the song without needing to listen to any of the guitar parts in the background. Sometimes that means you’ll need to play along with a metronome and other times it means you need to listen carefully to the drums.
Import the Song (Guitar Pro 8 only)
While I recommend following the above advice and practice playing along with the drums with all other tracks muted, it’s also good to practice playing along with the actual song.
If you want to be able to hear the song while reading the TAB in Guitar Pro, import the song’s audio file (if you have it) into GP8.
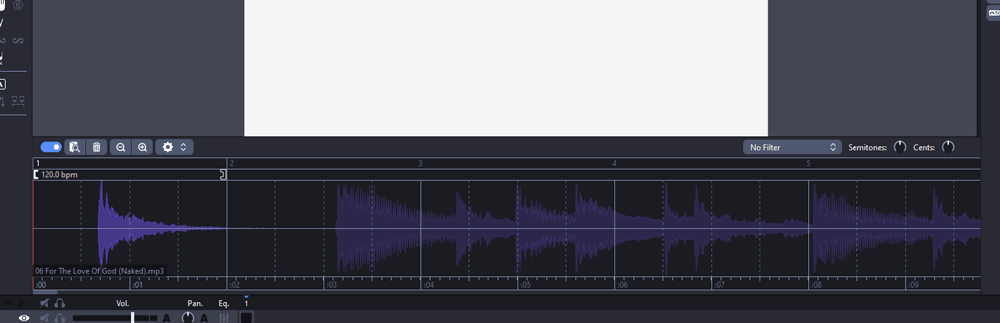
Once you learn how to sync the audio (covered step-by-step in my review), you will be able to loop, slow down, and practice along with any part as you like.
Step 7: Polish Your Playing
At this point, you should congratulate yourself for being able to play the song. If this is the first time you’ve learned an entire song, that’s a great achievement.
While you might be tempted to move on to the next song, I highly recommend spending some time ‘polishing’ your playing.
As a guitar teacher, I often hear students say they know a song, but when they play it they don’t play it as well as they think it sounds. Just because they can get through a song doesn’t mean they played it well.
Here are some ways you can polish your playing with any song.
Record Yourself
The best way to find out how well you know the song is to record yourself playing it. When you listen back to your playing, you might be surprised by what you hear. You’ll suddenly notice mistakes you didn’t notice while playing, you’ll hear issues with your timing and you might notice some parts just don’t sound quite right. That’s normal and you shouldn’t stress. It takes time to truly perfect a song and learn to play it flawlessly.
Recording yourself uncovers all the areas you need to spend a bit more time working on and perfecting. There are a lot of different ways you can record yourself. You don’t need a high-quality recording – you just need something clear enough to hear what you played.
Here are a few different ways you can record yourself:
- Use an app on your smartphone
- If your amp has a USB connection, connect it to a PC/Mac and use a recording program
- Use a looper pedal to record sections of the song or the entire song (some looper pedals have very long recording times)
- Connect a microphone to your computer
The chances are you will have at least one of the above points available right now to record yourself. It doesn’t matter if the recording isn’t good quality, it just needs to be good enough to hear what you’re playing.
I talk about this in this podcast episode – have a listen to it (or read the transcript) for more advice on why you should record yourself.
Slow the Song Down Again
For any parts you need to improve, the best way to improve how they sound is to slow them down when you practice them. This will stop you from rushing and force you to really focus on every single note and chord. Take your time and resist the temptation to play the parts at full speed.
In Guitar Pro you can use the speed settings to set a ‘Relative speed’ as shown below:
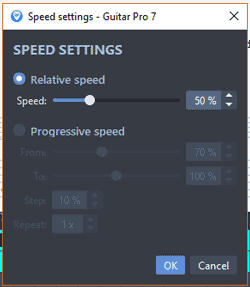
With this setting, the entire song will play at the speed you set. Highlight the section you want to work on, loop it and set a speed slow enough that you can really focus on what you’re playing.
Step 8: Move On But Keep Coming Back
At this point, you’re ready to move on to the next song and repeat the steps. But that doesn’t mean you’re finished with this song. Every time you work on the song, you will get a little bit better at it. Even advanced guitarists keep practicing songs they already know to keep improving.
Steve Vai has said in interviews that every time he plays his songs live, he gets a little bit better at playing them. Some of his songs he’s been performing for 30+ years, so don’t think that anybody can master a song in a month or two.
The point to remember here is that we’re never really done with learning a song. We can always get a little bit better and if you try to keep improving at the songs you already know, you will become a far better guitarist. Never think that you’ve mastered a song and you don’t need to practice it anymore. Always try to play it better and sharpen your skills.
Here are some more lessons and useful guides to help you learn songs:
- When to Move on When Learning a Song
- How Long Does it Take to Learn a Song on Guitar?
- Easy Fingerpicking Songs
- Easy Chord Songs
- How Long to Practice Guitar